
Featured Youtube Video

My Latest Instagram Post
Instagram did not return a 200.Categories
- About Me (3)
- Adoptable Pups (1)
- All Things Ava (1)
- Aviation Weather (8)
- Beauty & Fashion (2)
- Business of Aviation (2)
- Child Sexual Abuse (2)
- Cross Country Flying (8)
- Dangerous Drugs (4)
- Dog Rescue (3)
- FAA Dispatcher Exam Prep (3)
- Favorite Things (7)
- Flying Lessons (25)
- Grieving (1)
- Holiday Fun (2)
- Home Decor (2)
- Hotel Reviews (1)
- IFR Written Test (3)
- Inspiration (4)
- Instrument Checkride Preparation (5)
- Legal Marketing (7)
- Life with a Toddler (6)
- Motivation (3)
- Movies (2)
- Music (3)
- Personal Injury Law (6)
- Private Pilot Exam (12)
- Recipes (2)
- Song Meanings (1)
- Taylor Swift (1)
- The Bachelor (1)
- VOR (1)
- Work Travel (1)
Recent Posts
- Save Energy and Save Money ~ Get $10 When you Sign up with OhmConnect!
- 2018 Review: Sheffield School of Aeronautics – Dispatch School in Fort Lauderdale
- Kitchen Table Sanding & Refinishing Project – Dewalt Sander and Minwax Stain
- Pokolodi Lodge Review – Aspen Snowmass, CO
- Aircraft Dispatcher Exam: Lesson Two (Aerodynamics and Aircraft Systems) – Wing Lift Devices
| M | T | W | T | F | S | S |
|---|---|---|---|---|---|---|
| « Jun | ||||||
| 1 | 2 | 3 | 4 | 5 | 6 | 7 |
| 8 | 9 | 10 | 11 | 12 | 13 | 14 |
| 15 | 16 | 17 | 18 | 19 | 20 | 21 |
| 22 | 23 | 24 | 25 | 26 | 27 | 28 |
| 29 | 30 | |||||
Categories
- About Me
- Adoptable Pups
- Aerodynamics and Aircraft Systems
- All Things Ava
- Aviation Weather
- Beauty & Fashion
- Business of Aviation
- Child Sexual Abuse
- Cross Country Flying
- Dangerous Drugs
- Dog Rescue
- FAA Dispatcher Exam Prep
- Favorite Things
- Flying Lessons
- Grieving
- Holiday Fun
- Home Decor
- Hotel Reviews
- IFR Written Test
- Inspiration
- Instrument Checkride Preparation
- Legal Marketing
- Life with a Toddler
- Motivation
- Movies
- Music
- Personal Injury Law
- Private Pilot Exam
- Recipes
- San Bernardino City Shelter
- Song Meanings
- Taylor Swift
- The Bachelor
- VOR
- Wing Lift Devices
- Work Travel
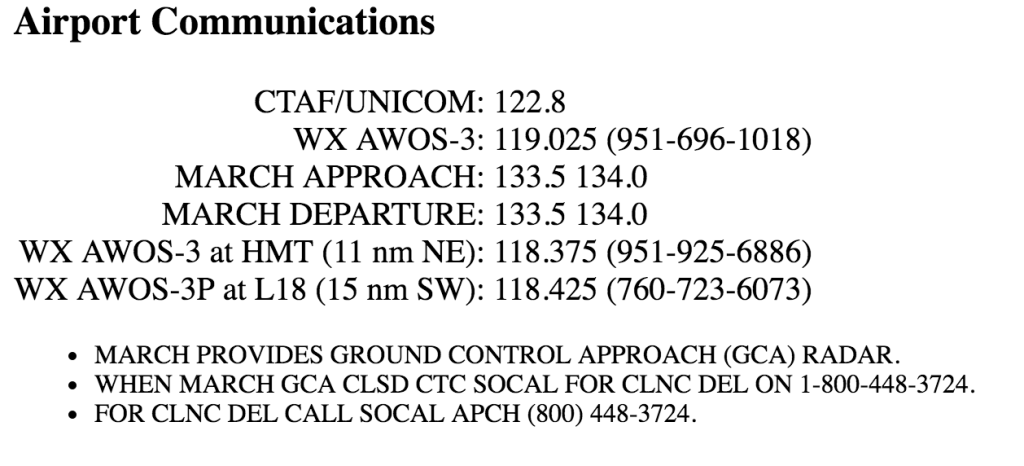
Understanding IFR Weather: AWOS-1, AWOS-2, and AWOS-3
I know for the instrument checkride next month I will be asked about the different types of weather reporting. This is important to know, because as a pilot, you need to be able to not just interpret the weather, but also know what types of weather reports you need. At KCRQ (Carlsbad), there is an ATIS. At KOKB (Oceanside), there is an ASOS. F70 (French Valley) has an AWOS-3. So what’s an AWOS? AWOS stands for Automatic Weather Observation System. It is a unit that measures and reports local weather at an airport to pilots.
There are four basic levels of AWOS:
- AWOS-A: Reports only the altimeter setting.
- AWOS-1: Reports altimeter setting, wind data, temperature/dew point and density altitude.
- AWOS-2: Reports the information provided by AWOS-1, plus the visibility.
- AWOS-3: Provides the visibility provided by AWOS-2, plus cloud-ceiling data.
For Part 121 or 135 operators, AWOS-3 is the only type of AWOS that’s acceptable without restriction.
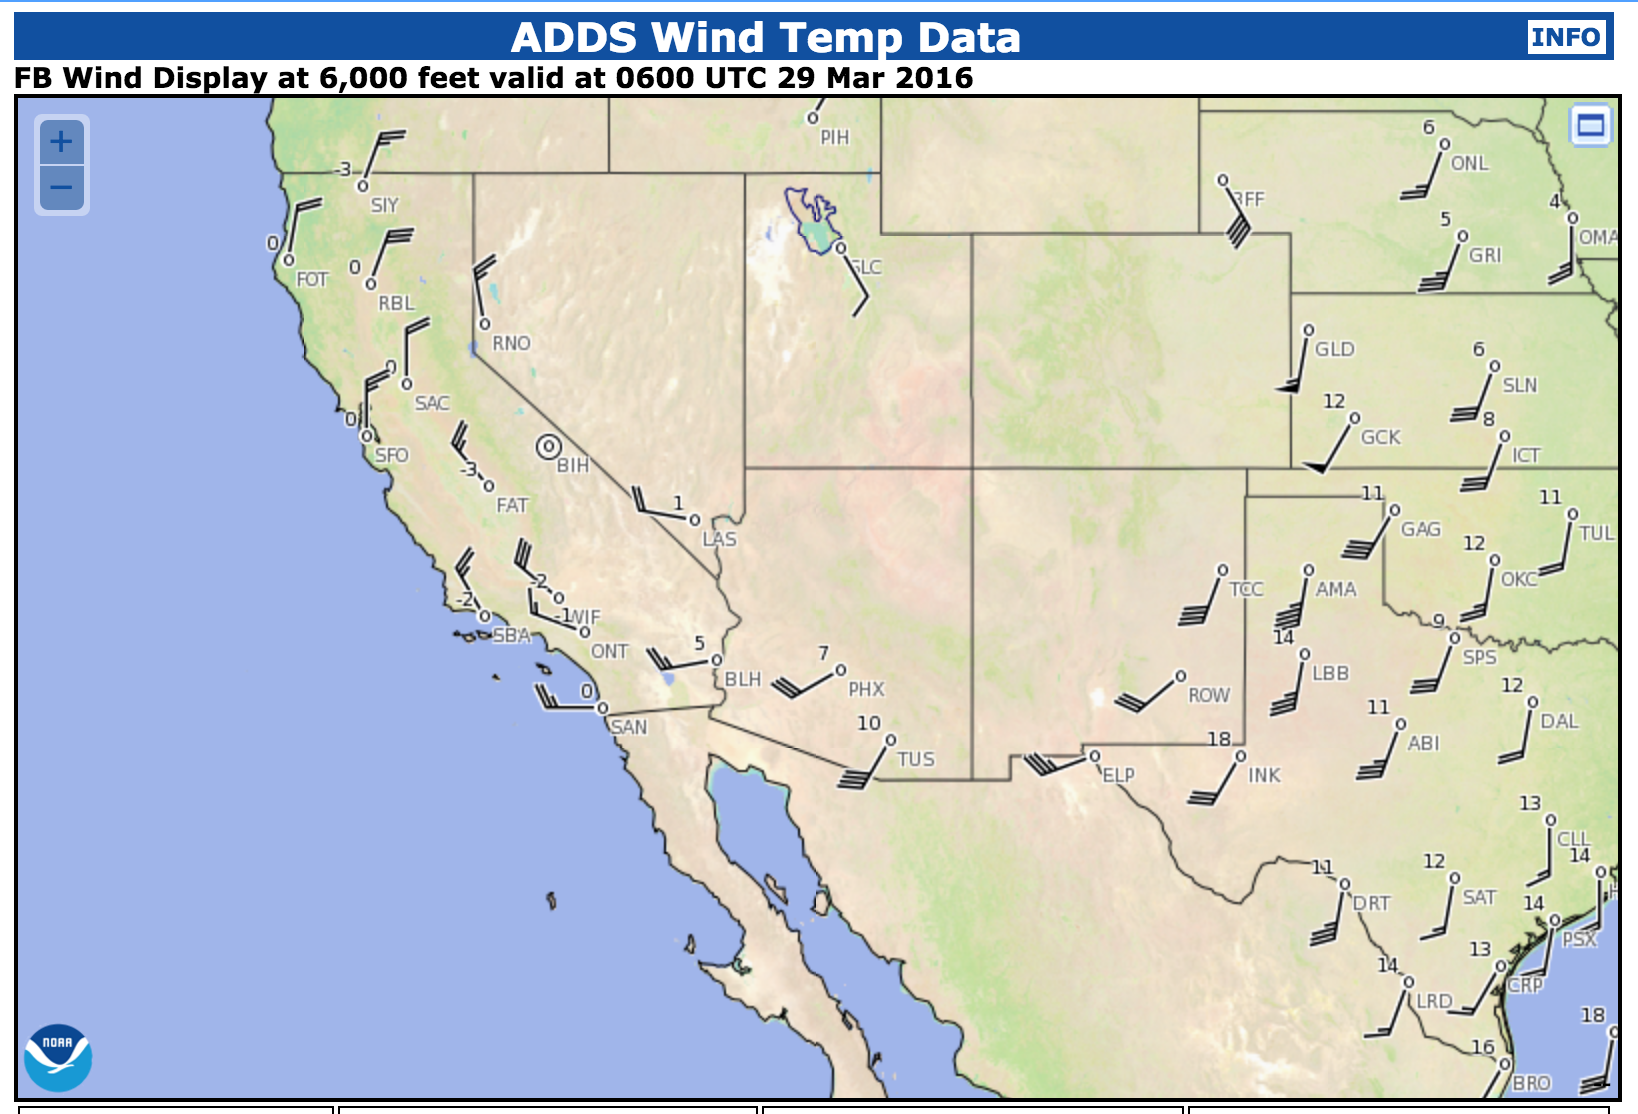
Instrument Checkride Prep: Reading Aviation Winds and Temperatures Aloft Forecasts
On the instrument check ride next month, I know the examiner will be asking me about the Wind & Temps Aloft forecast. This is issued 4 times daily for different altitudes and flight levels. The format is DIRECTION – SPEED – TEMPERATURE. If it says 9900 then that means light and variable. Wind direction is from true north, according to aviationweather.gov.
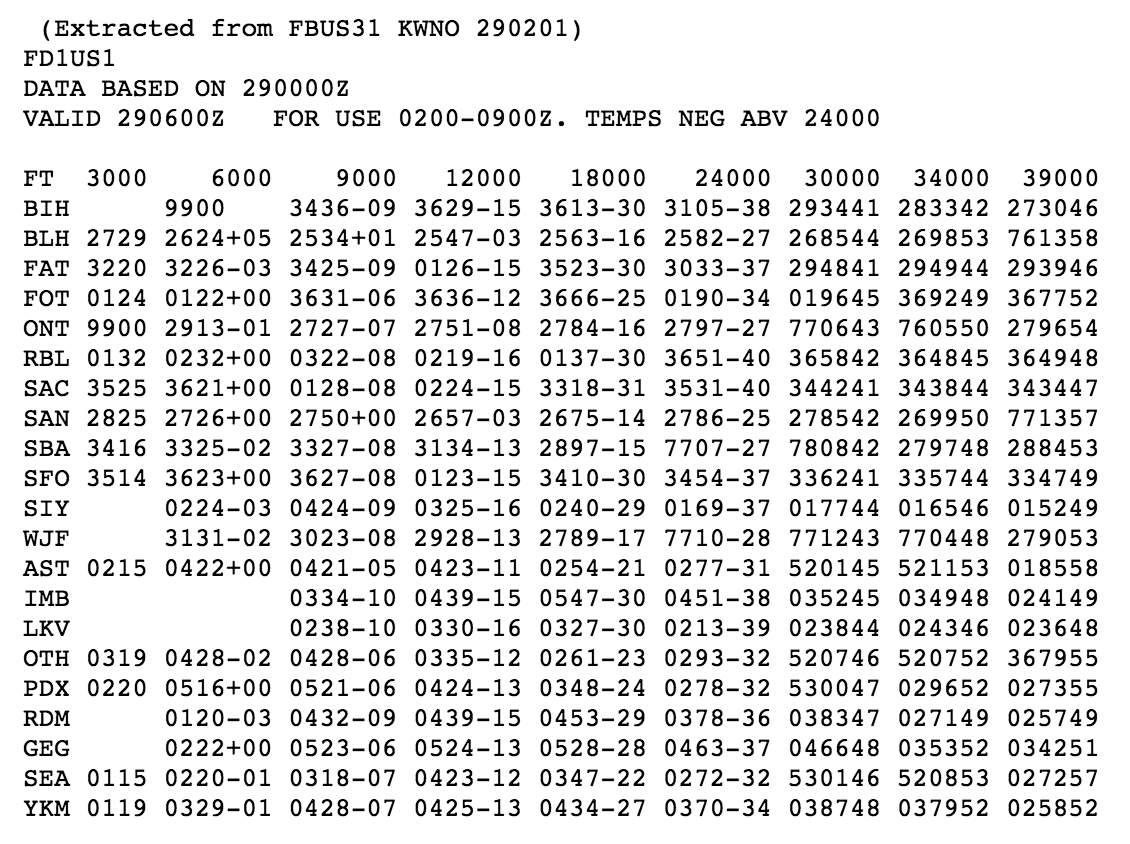
Things get a little tricky when the wind is is about 100 or 200 knots. Just remember “Between 51 and 86.”
When the wind speed is 100 knots or greater, wind direction is coded as a number between 51 and 86. And then you subtract 50 from that number – that’s your direction. And then you add 100 to the second set of numbers. That is your wind speed. Let’s practice:
“751950”
- Direction (75-50) Winds coming from 250°
- Speed (19 + 100) 119 knots
Above 24,000 feet, the temperature is assumed to be negative. If this forecast was issued at 34,000, you would assume the temperature to be negative 50 degrees.
Let’s try another one, from tonight’s forecast:
At 39,000 feet over SAN: “771357”
- Direction= (77-50) winds coming from 270°
- Speed = (13 + 100) 113 knots
- Temperature = -57 degrees
another one, just for fun. at 39,000 feet over BLH: “761358”
- Direction= (76-50) winds coming from 260°
- Speed= (13+100) 113 knots
- Temperature -58 degrees
All levels through 12,000 feet are true altitude (MSL). The levels 18,000 feet and above are pressure altitude.
Instrument Checkride Prep: Reading and Interpreting the METAR
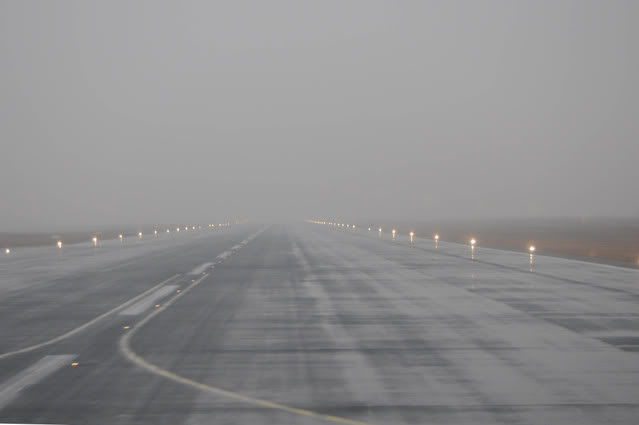
I’m taking the instrument check ride next month and I’m going to be blogging nightly on different topic in preparation for all of the stuff I think will come up on the oral part. I am preparing for lots of aviation weather talk, so at least the next week will be over those topics. I will have to explain things like the difference between a stable and an unstable atmosphere, what standard temperature and pressure values are, and the two basic ways that fog may form.
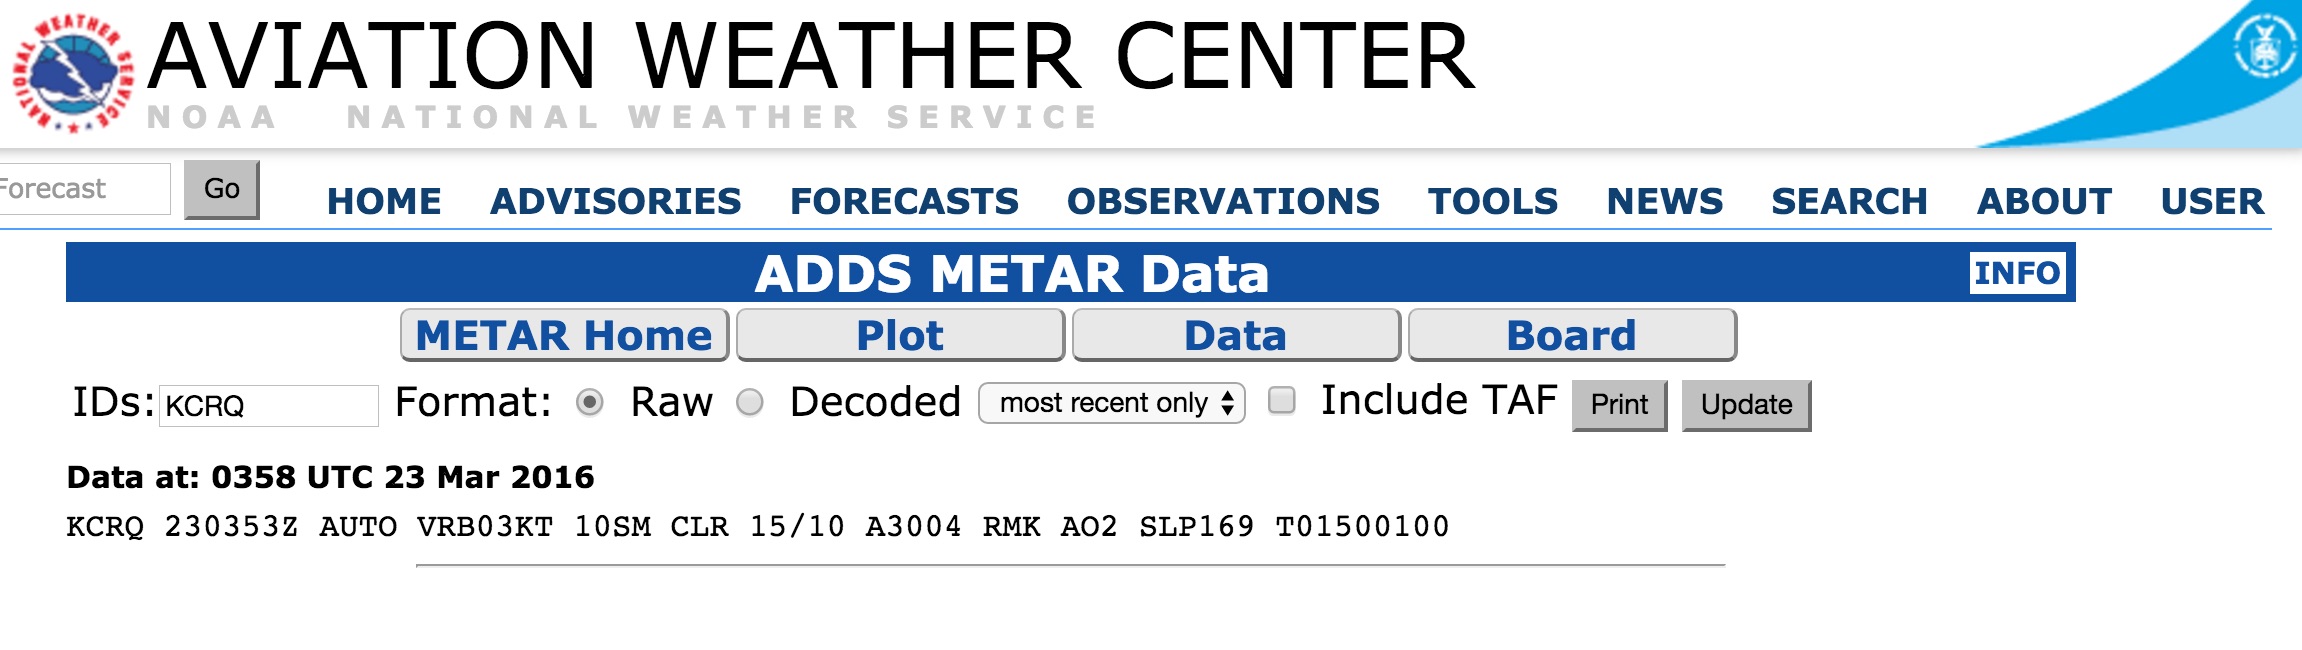
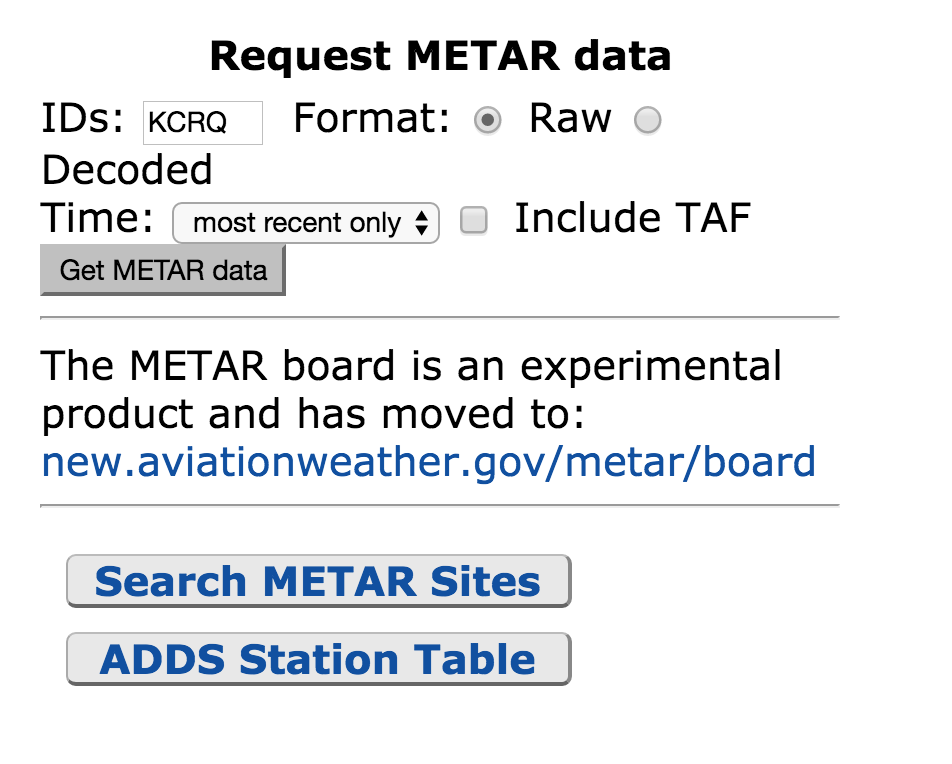
One very basic thing I will have to do is hop on aviationweather.gov and read and interpret a METAR. The first thing I will do is going to aviationweather.gov and click on METAR – it’s in the upper left hand corner of the website. Then I will scroll down to near the bottom of the page – on the right, where it says “Request Metar Data”, and I’ll type in the identifier of my airport – in this case KCRQ.
The METAR reads: Data at: 0358 UTC 23 Mar 2016 KCRQ 230353Z AUTO VRB03KT 10SM CLR 15/10 A3004 RMK AO2 SLP169 T01500100

Here’s how I’d read this: Airport is KCRQ, Carlsbad, CA Time – 23nd of March at 03:58 Zulu Time. I convert the time and it’s the 22nd of march at 20:58 Pacific Daylight time. The AUTO, when it appears just after the time group, means that the observation is from an automated station. Winds are light and variable at 3 knots, visibility is 10 or more statute miles, sky is clear, Temperature is 15 degrees, Dew Point is 10 degrees. Remarks: A02 means the station has a precipitation discriminator. SLP stands for Sea Level Pressure, which is another measure of atmospheric pressure. The Last digits that start with a “T” are the he hourly air and dewpoint temperatures to the nearest 1/10 C degree.
Tomorrow night I think I will review the Winds and Temperature aloft chart, and what valuable information can be determined on there, like the most favorable altitude, areas of possible icing, temperature inversions, and turbulence.
IFR Checkride Prep: Alternate Airports and the 1-2-3 Rule
 Next month I will be taking my Instrument Rating checkride! I am very excited, not because I have any desire to fly straight into some big puffy clouds, but because it is an important step in my progress of being a more experienced and qualified pilot. I’ve finished two big hurdles already, I have gotten my 50 hours cross country PIC time, including a few solo cross country flights, and I’ve passed the FAA written exam. I’m also about half way through the commercial ground school. I was planning on taking that written exam before the Instrument checkered, but I’m not sure if that will happen yet. In any event, I will be studying aviation every night.
One question that I anticipate coming up on the checkered is “How do you know if you’ll need to list an alternate airport on your IFR flight plan?” And no, it’s not acceptable to just say, “I’ll list one anyway, just to be safe.” The examiner is going to give me a weather forecast at an airport and I’ll have to tell him whether or not I need an alternate. I will refer to the 1-2-3 rule of IFR flying. It’s pretty simple.
From ONE hour before to ONE hour after your planned ETA at the destination airport, the forecast has to be at least 2,000 foot ceiling and 3 mile visibilities. If those weather minimums are met, than no alternate airport is required. But if the ceiling or visibility is less than TWO thousand feet and THREE miles, then you need an alternate. And there are some rules about your alternate, depending on the available instrument approaches.
If an IAP is published for that airport, you must be able to land at the alternate minimums specified in the procedure, or if none are specified:
(1) for a precision approach procedure: ceiling 600 feet and visibility 2 statue miles.
(2) for a non precision approach procedure, ceiling 800 feet and visibility 2 statute miles.
(3) If there is no instrument approach procedure published for your alternate airport, the ceiling and visibility minimums are those allowing descent from the MEA, approach, and landing, under basic VFR. In class Echo airspace below 10,000 feet MSL, basic VFR is 3 statute miles visibility and cloud clearance of 500 feet below, 1,000 feet above, and 2,000 feet horizontal.